skip to main
|
skip to sidebar
Hello on the first day of the last month,
Today being the first day of December 2011, I am very sure lots of my peers in crafting are gonna get busier. Well, I won't deny myself that I am in a lot of holiday mood and that means lots of crafting and fun!!!!
So, I made this beautiful (I think I should let you guys decide that :P) butterfly..Well, I won't say its way too special but since its my first proper quilled butterfly it is special to me.. Not only it turned out all bright and cheery it was quite big than the size I had in my mind (and pattern too!!:P). Please have a look..
Now, this is my very first time when I executed the idea right from the beginning. Though it took a lot of time...compared to time taken normally by quillers but I am satisfied...
I would also like to share the Step-by-step pictorial instructions on how to make a butterfly like this...I am doing this as I searched a lot but could not really find proper step by step tutorial for the same. And so I thought of sharing one myself...
(I am not very good at things called tutorials but I had given my best shot at providing a pictorial as well as theoretical explanation...:))
1) The first step was to have a pattern in mind. Well, you dont have to be very strict for a pattern but it certainly helps you when u actually sit down and start quilling as otherwise a lot of confusion takes place (happens to me for sure!!) as to size of the coils, color scheme etc.
(Sorry! for the way pics came out coz of my impatience :oP)
I drew a very simple butterfly pattern on a small piece of tracing paper with an approximation of the size and roughly drew patterns on the wings keeping in mind the color scheme I wanted. Again, I would like to stress, you DON'T have to be strict about anything...I made a lot of changes while making the actual product myself...
2) The second step is to select a color scheme and allot colors to the pattern and the shapes you would like to use for the patterns. I selected bright orange and bright yellow color combination for my butterfly and used mainly simple quilling shapes (teardrop, half moon, tight coil to be precise).
I shaped a few coils first.
All of them are separate at the moment and pins are placed just to see how it will look like once glued.
I glued the ones I made and started adding more details. I outlined the whole wing with a red color strip to highlight the edges a bit (more noticeable in the final outcome.)
I kept it on my pattern after gluing the first wing and as you can notice, it is quite different from the pattern originally planned :P
3) After you are satisfied with one wing, the work gets easier. As the second wing is supposed to be exactly the same as the first (Again, no strict rules apply!). It took me no more than 10 minutes to finish this second wing as opposed to an hour for the first.
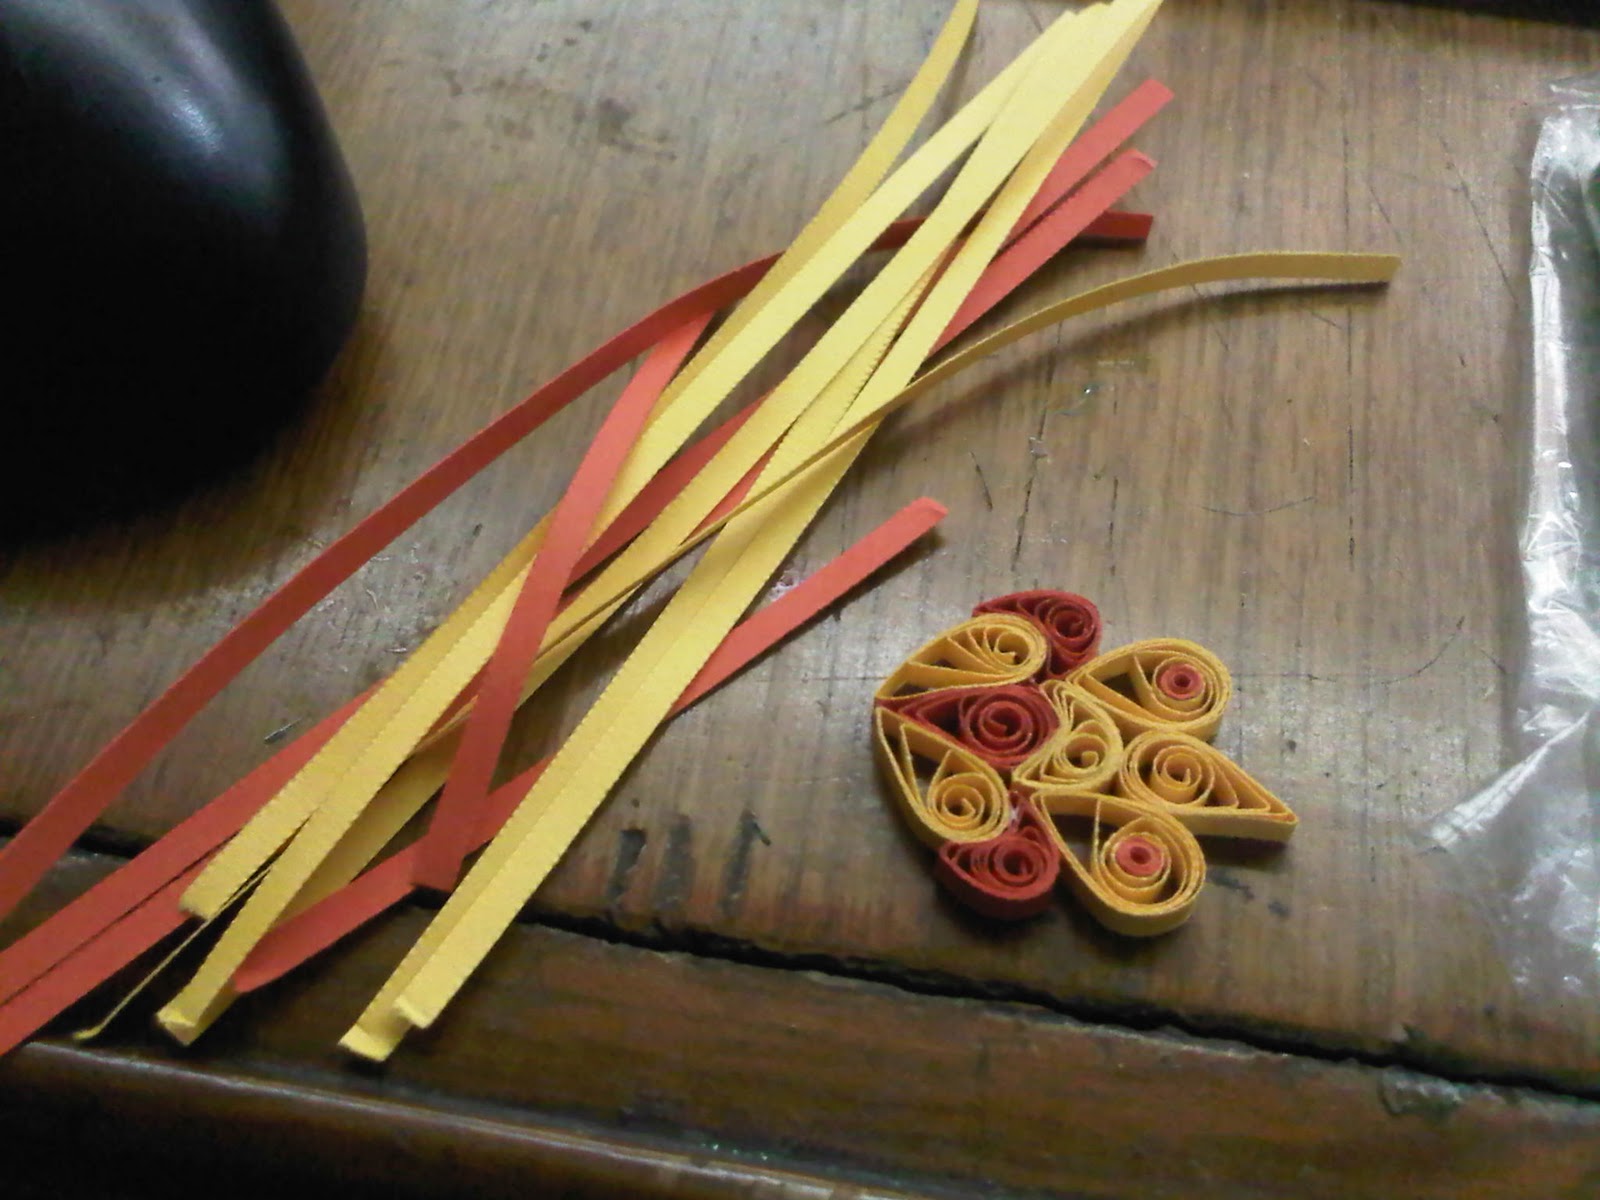
4) Design the lower wing. I followed on lines of upper wing only but kept it a bit smaller in dimension.
On the left are the total strips that took me to create one lower wing. On the right is one completed lower wing. Also, please note that I have used almost half the length of strip to make coils for lower wing compared to the length of the strips that I used to make coils for upper wing. This automatically made the lower wing smaller.
5) Finalize the design by placing on the board and with the help of pins their placement can be decided.
Also, notice the body and head of the butterfly. I used a crimped strip to roll the head and two normal strips to make the two-part body of the butterfly.
Also, I was stupid enough not to take care of the shape of the wings and hence, when I placed them, a gap was noticed.
6) Make the final adjustments. I inserted two tear drop shapes to cover the gap and also give strength to the overall structure. I also folded a brown strip which was used to make head and body in half to create the antennas. This is how it looked-
7) Glue everything together- Once you are happy with the placement, carefully glue everything together and let it stand for a few mins with the help of the pins. Then remove all the pins and your beautiful butterfly embellishment is ready to flutter! :D
Well, I hope you liked it. I am sure a lot of ways to use this pretty creature must have propped in mind as soon as you see it. A catchy fridge magnet!!, or a hanging ornament? How about a gift box topper or to put on a card to make a beautiful greeting card...its uses are endless.
I thoroughly enjoyed making this, hope you had fun looking too...
Have a great Day!!!
Just Love Crafts xx
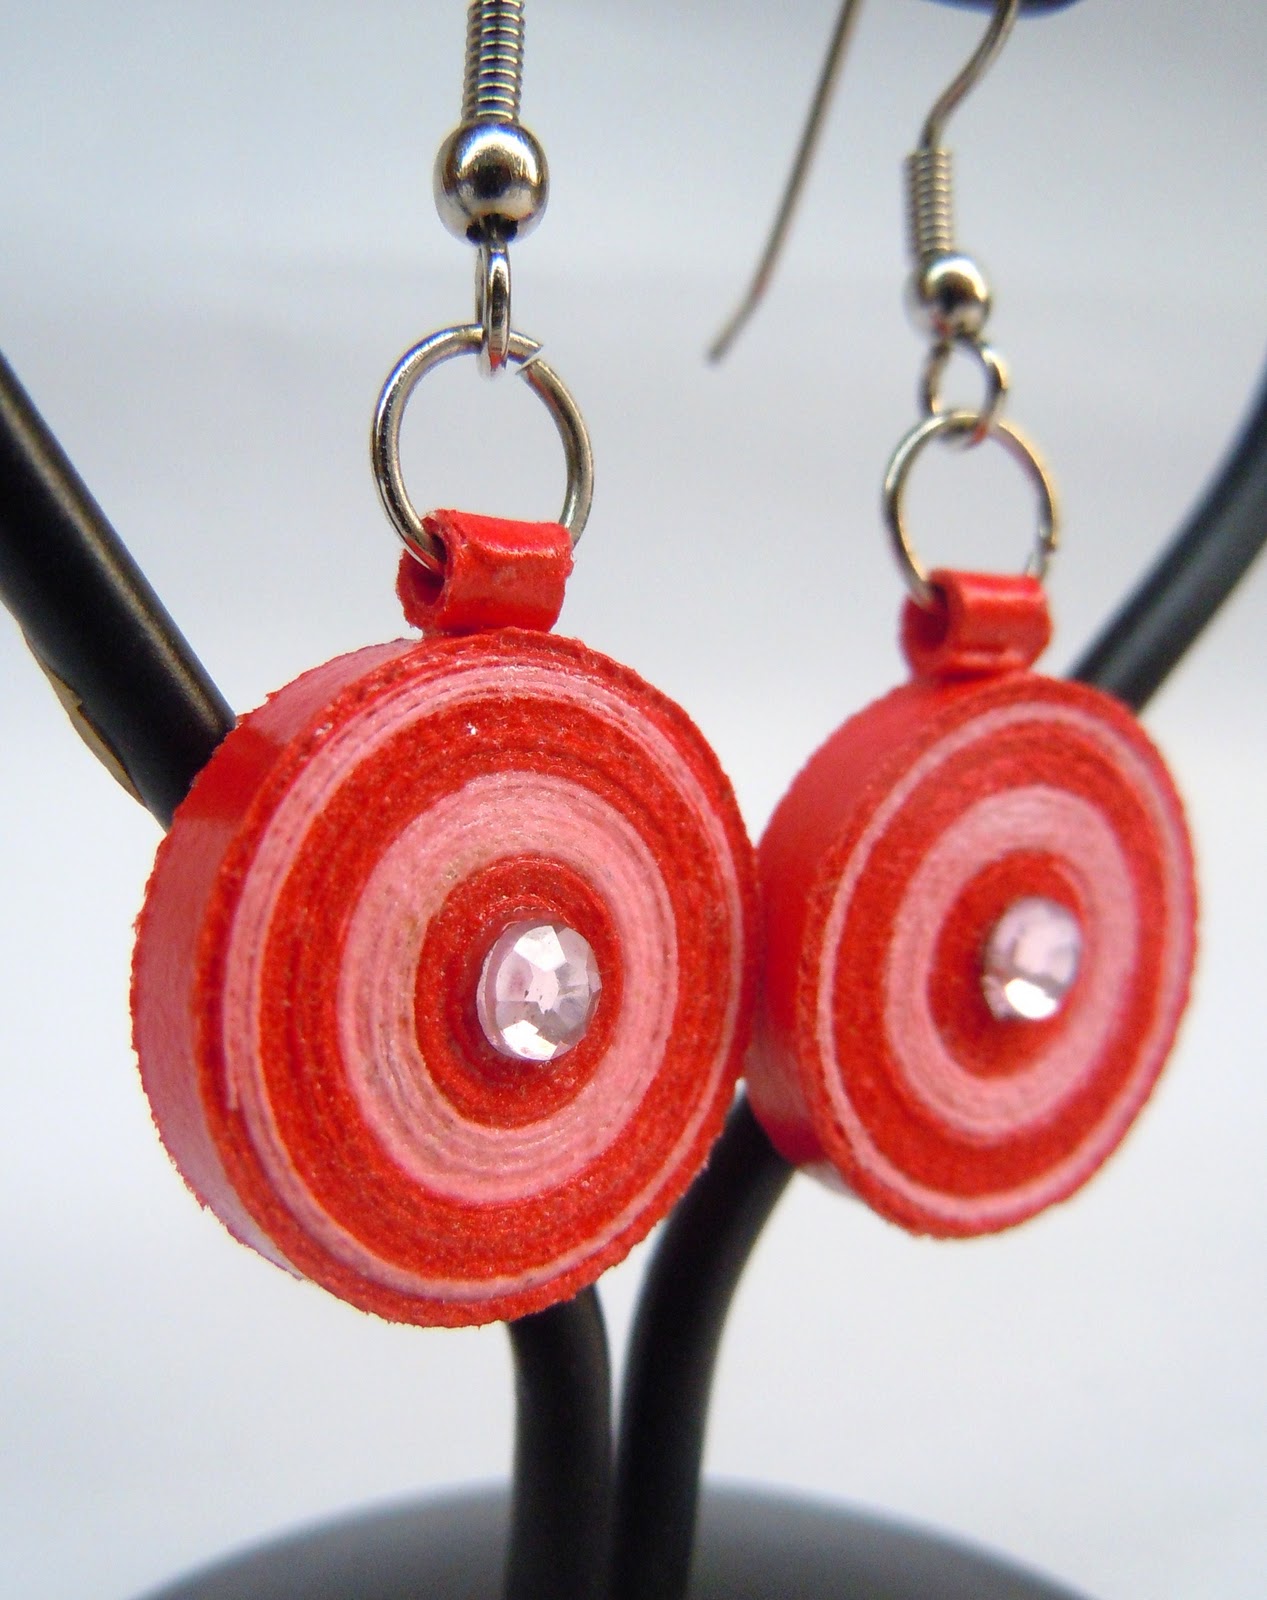
Finally I am doing something for a purpose...This post is entirely dedicated to a very talented and a sweet person Pritesh. Well, It's basically her giveaway and I somehow completely missed entering it and so this last moment entry for her. I am presenting red and pink quilled circle earrings. They are sweet, simple yet really pretty and bright.
We were supposed to use red and quilling. I even typed this post in red to make it special for Pritesh as its her b'day giveaway (hehehe!!) :)
Here is the pic-
Pretty no...:P
Just Love Crafts xx
Hey peeps,
I have got something special to share with you all. I said in my last post that I was busy making something for a very special friend. And I finally completed it. Well, it was supposed to be a gift and I intended to send it too. However, postponed the idea for a while because of our stupid Indian post. :( :(
Well, apparently they tried charging me so high for something which weighed less than 100 gms that I need to work out some other way to send it...
Nevertheless that shouldn't refrain me from sharing this with you all. :)
Ok, so this is what I have made. Its a Quilled Monogram of the person's first letter of the name. here it is-
This is my first attempt at such kind of quilling and probably my biggest project too so far :p but I was surprised that it didn't take a lot of time. I finished this is 3 days working only a few hours on and off per day. I took approx. 2 hrs to make the frame from the scratch.
I am just unsatisfied with the base. I mistakenly used a printer sheet for the base, and so when a lot of glue was applied, the paper shrunk as can be noticed on the edges of the pattern. My advice is to use a thicker sheet or cardstock when making closed designs like these.
Would you like to see the step by step construction for it??
I have taken a few pictures explaining the process. Hope they help...
Firstly, I printed the monogram on a normal white sheet (printer paper). I found this beautiful design here.
I outlined it with A4 length 3 mm dark blue strips. That's how it looked-
I know it isn't really neat at this stage, but your flaws are easily hidden as the design fills. :p
I started to fill one portion at a time. i wanted to use normal quilling coils but in different shapes. I started with inserting the ones I already have in certain areas and filling one portion with heart shaped coils.
As I mentioned before, took me three days to finish the whole thing. That's how it looked at the last day.
Its an A4 size sheet at the moment but I wanted to frame it and thus, I cut off about 1.5 cms each from top and bottom margin.
I searched for framing ideas all over the internet but didn't find anything satisfactory till I checked out Ina's blog and I found this amazing idea. I can't thank her enough for putting up such simple and clear instructions and the results are really satisfactory.
This is how my frame looked before assembling-
I had followed Ina's instructions exactly and it turned out to be perfect. However, I made one more mistake of using pastel sheet for the frame. Basically, I was too lazy to go to the market to buy some good paper for framing and thus, settled on the one I had at my disposal. Well, the frame turned out to be fine, but while assembling I faced the problem of sticking the ends properly. As the corners kept falling apart unless I fed enough glue. Never mind but, the frame looked nice once completed.
This is the final look of my framed quilled monogram-
I hope you like it. If there are any questions you would like to ask me regarding making this, please feel free to ask me.
Thank you
Just Love Crafts xx
Heya Crafters,
I am back!! Have been quite busy preparing something special for a special friend...:P. But will talk about it later. This post is for my very First Challenge!! that I am participating in and I am very excited about it....
Well, this is my first challenge and secondly it is on something I really enjoy.....recycling. Voila!!
Without much hullabaloo, I will show you the pic...and here it is -
This is my favorite cookie's box. Its a cylindrical cookie box, the ones usually we find at Cafe Coffee day outlets. I found one lying around the house and knew instantly it would make a perfect gift box (Gift boxes can be cylindrical too, right?? :P). I simply covered it with a pretty floral patterned paper and made matching motifs with quilling. There are 4 heart motifs in the central circumference of the box and a quilled flower on the lid with a rhinestone embellishment (which is apparently recycled too as it was taken from a discarded wedding card :)).
I am entering this project in the Crafty Creations Challenges Blog under Recycle, Recycle, Recycle Challenge.
Wish me all the best!!!!
Just Love Crafts xx
Hey all bloggy friends,
I was fiddling through the images in my craft folder and saw these flowers scattered all over..:P and I thought it would be nice to share them with you.
The interesting thing is that all of them are particularly roses (I love roses btw!!!). I have made more flowers but these are the ones I am particularly fond of :)
Ok! I won't bore with long stories, here is the first set of roses I made using Folded Rose technique. This is displayed nicely here. Although I really don't remember the actual tutorial :( but the one I have provided is really good too :).
I used them on a greeting card but they didn't fit really well on the flat surface of the card as their backs are quite protruding to use them on plain surface..I guess they can be used nicely when used in a cluster with backs facing each other..:)
Ok!! Now the second one (I am actually going in the order of their making!!)... This is also a paper rose but crepe paper rose. I learned this with hit-and-trial and I guess I haven't been able to do it very well till now, as the first rose (which I made with utmost patience and care!!!) came out well....but my second attempt was not all that great :P..anyways this is the first one...
I later dusted it with a silver glitter spray and in order to show the effect of the glitter took a horrible picture... :P
Now! I am sorry I will not be able to provide you with a tutorial to make these roses as I didn't find one myself (if you know one, please do post it to me in comments..much appreciated!)...basically I saw a rose just like this one (but much neater!! :P) in a street fair in London created by a lovely lady whose shop was stocked with roses of these kinds but in much bigger sizes and prettier colors. I couldn't help asking the method to make these and she was kind enough to give me a brief about making petals...however, the silly me didn't have the required supplies and so I waited till my next craft shopping trip to buy them..which came almost two months later.....And as you can expect, I had forgotten half of the details by then and ultimately made it using hit-and-trial...
However, one of my really good friends loved this rose and gave me an order to create a same one...so i guess it was not such a bad attempt :)
And finally, I would like to share my latest set of quilled spiral roses. Here, have a look-
I have made them last month for some special reason which I would share very soon ;) I love these roses so much that I made some more of them....
I just love making them and just looking at them cheers me up in the worst of my moods too :)
I hope they cheered you up too :) :)
Will be back soon with more crafty titbits!!
Just Love Crafts xx
Hola!
Today I am sharing something new with you, as in not something I made previously but something I made yesterday. Well, I precisely started with creating simple spiral roses. Basically I made them for a special friend :)
But I found them too bland, so I thought of adding some sparkle to it...I tried it for the very FIRST time...and was quite scared of the results, but its fun to experiment and then marveling at ur mistakes and make more experiments....and getting something you finally like...:P
This is what it looks like after adding a bit of *Sparkle*..I am happy with the result as they are quite noticeable from the simple flowers at the same time there is a bit of an extra dimension which seems to be added on to them with use of this glitter.....
But....... But....... But..... this post is about some "Giant" flowers and they dont look much giantish....so, i'll show you something which I made and used these spiral flowers on it...
So I used something which have been lying in my cupboard for almost 6 months now and havent got a chance to be used...
And that is my Scalloped heart punch...
I punched out some quick hearts, of the same paper, embossed the edges and assembled them as a flower... Finally I just stuck a spiral rose to make a center and this is the result...
This flower is made in 2 layers with third as the center...
this is quite big, I tried picturing it by taking it in my palm, but it didnt fit really...:P
I am yet to use this Giant flower in a project as I was too eager to show you all...:P But as soon as I come up with something, I'll surely share it as well...so far it can be used on cards, scrapbooks, as a stand alone embellishment or room decor as well...I am sure the possibilities are endless....
And I am sure all you lovely crafters must have figured out a way already to use this...Please do share with me in your valuable comments, the possible uses of this flower...I would love to and in fact will try to try all of them.....
Do let me know if you like it...I will be back soon with more posts and pictures...:))
Just Love Crafts xx
Hey all my crafty buds,
As promised, I bring to you my first crafty post.. Now though blogging is something I have started now only, but crafting I have been doing before also...so I'll start with sharing something I have already done...and each one of it is really special to my heart...hope you enjoy looking at them... :)
Though I got to know about quilling like 3 years back...I just made one card at that time which you can see here. Pardon the picture quality..at that time I just had my mobile phone cam which was 1.3 megapixels... :P
I left it for like almost 2 years and reverted back to it while I was studying in London and needed some creativity to keep me alive there...
This is what I started with-

I ordered some quilling strips from Amazon and luckily!! I was carrying a quilling tool which my sister gifted me almost one year back. This is what I had in total then... Looks pretty na!! And that is how i made this flower just playing around with my newly arrived package....
Further on, I started to dig information online on quilling and the variety of crafts that can be made, and I found Miniature Quilling very interesting...that was something I never tried my hands on as well, and so I was desperate to try some...here is the result..
I included the penny coin in the picture just to show the comparison of the size of these miniatures. I made all of them in one sitting and simply coated them with PVA glue and they are still with me and in the very same condition....
i know that the size of the teapot is a bit small and the cups look giant-size in front of it!! but they were soo adorable and whoever saw them didnt mind so I just let it be...Also I almost ran out of orange strips too....:P
And finally a third kind I made around the same time is this cute picture frame cum card-
I had found such cards for 10 p each at Hobbycraft stores in UK at the clearance section and I didn't even know what I am going to do with them when I bought...:P but i guess we all do the same at some point.... Crafting is awesome...
I tried my hands at some more varieties of paper crafts which I will share very soon in my further posts.... right now my eyes are falling badly....:O
Good night friends!!
Just Love Crafts xx
Hello,
Yes!! Finally I am also smitten by the blogging bug..Well, I'll be honest, this is NOT my first blog and hence I can't say I have just started Blogging or Crafting recently...I have been doing crafting ever since I was a child but as a hobby or more or less time pass till I realized this is where really my passion lies...!!! and I started blogging like approx. 3.5 years back...
But..
It was such a novice attempt that I consider this time as my first time...:P I would like to share my silly experiment with all of you, of course! Myartisticcreations was my first blog related to my crafts and interests..i was too much into dough crafts at that time..:O..but hey, u can check a quilling sample I did at that time which was interestingly my first quilling too... :)
So far, my interactions with blogs are limited to my hopping from one blog to another one admiring each one, liking and commenting on posts, learning and yearning (to have one of my own!! :P) etc.... but now, I finally decided to dive in and took this biggy leap towards starting all over again.....
Well, I am sure for those who have all those lovely pretty blogs, it seems no big deal..but for a person like me, who is apparently lazy, not very proficient in computing/ website making/ blogging etc.. it seemed like a humongous task which required a lot of inner motivation and conviction (Phew!!!!).. But little did I know that Blogging can be actually very therapeutic when started......and so far I am loving it...
I sat with a blank mind with only one thought...I wish to have a BLOG too....and started digging for help but My!! Blogger is just soo helpful...i am glad for the 1000th time to have started...
I am very well aware that I might lack a bit behind than all my crafting buddies but its ever too late..ryt!!! So here is my first post and I am feeling sooooooo relaxed and happy and satisfied...:P I have sooo much to share and I am happy that I finally got a platform to do that...
Well, I just hope that all you lovely people like my blog and I promise to keep posting fun things as much as I can...
Will be back soon with my first crafty post... :)
xoxo

 Now, this is my very first time when I executed the idea right from the beginning. Though it took a lot of time...compared to time taken normally by quillers but I am satisfied...
 (Sorry! for the way pics came out coz of my impatience :oP)
 All of them are separate at the moment and pins are placed just to see how it will look like once glued.
 I kept it on my pattern after gluing the first wing and as you can notice, it is quite different from the pattern originally planned :P
  4) Design the lower wing. I followed on lines of upper wing only but kept it a bit smaller in dimension.
 On the left are the total strips that took me to create one lower wing. On the right is one completed lower wing. Also, please note that I have used almost half the length of strip to make coils for lower wing compared to the length of the strips that I used to make coils for upper wing. This automatically made the lower wing smaller.
 Also, notice the body and head of the butterfly. I used a crimped strip to roll the head and two normal strips to make the two-part body of the butterfly.
 7) Glue everything together- Once you are happy with the placement, carefully glue everything together and let it stand for a few mins with the help of the pins. Then remove all the pins and your beautiful butterfly embellishment is ready to flutter! :D